This manual explains the structure and operation of GuitarStrokeHelper, a plugin for efficiently creating MIDI data for guitar performances.
Introduction
This plugin is a tool that combines Guitar TAB (fret positions) and Picking Patterns (strokes/string picking) to generate MIDI notes that can be played back in your DAW.
This plugin does not produce sound on its own
To hear audio, you need to route the MIDI to a separate instrument (guitar library/synth/sampler), or drag and drop the generated MIDI to an instrument track.
This is a MIDI output-only software
Data input is done through the plugin UI or by loading presets (MIDI keyboard input is also partially supported). Real-time performance input is not available.
Getting Started
DAW setup guides and tips
Reference
Feature walkthroughs and detailed explanations
1. Overview
The interface is divided into five main areas.
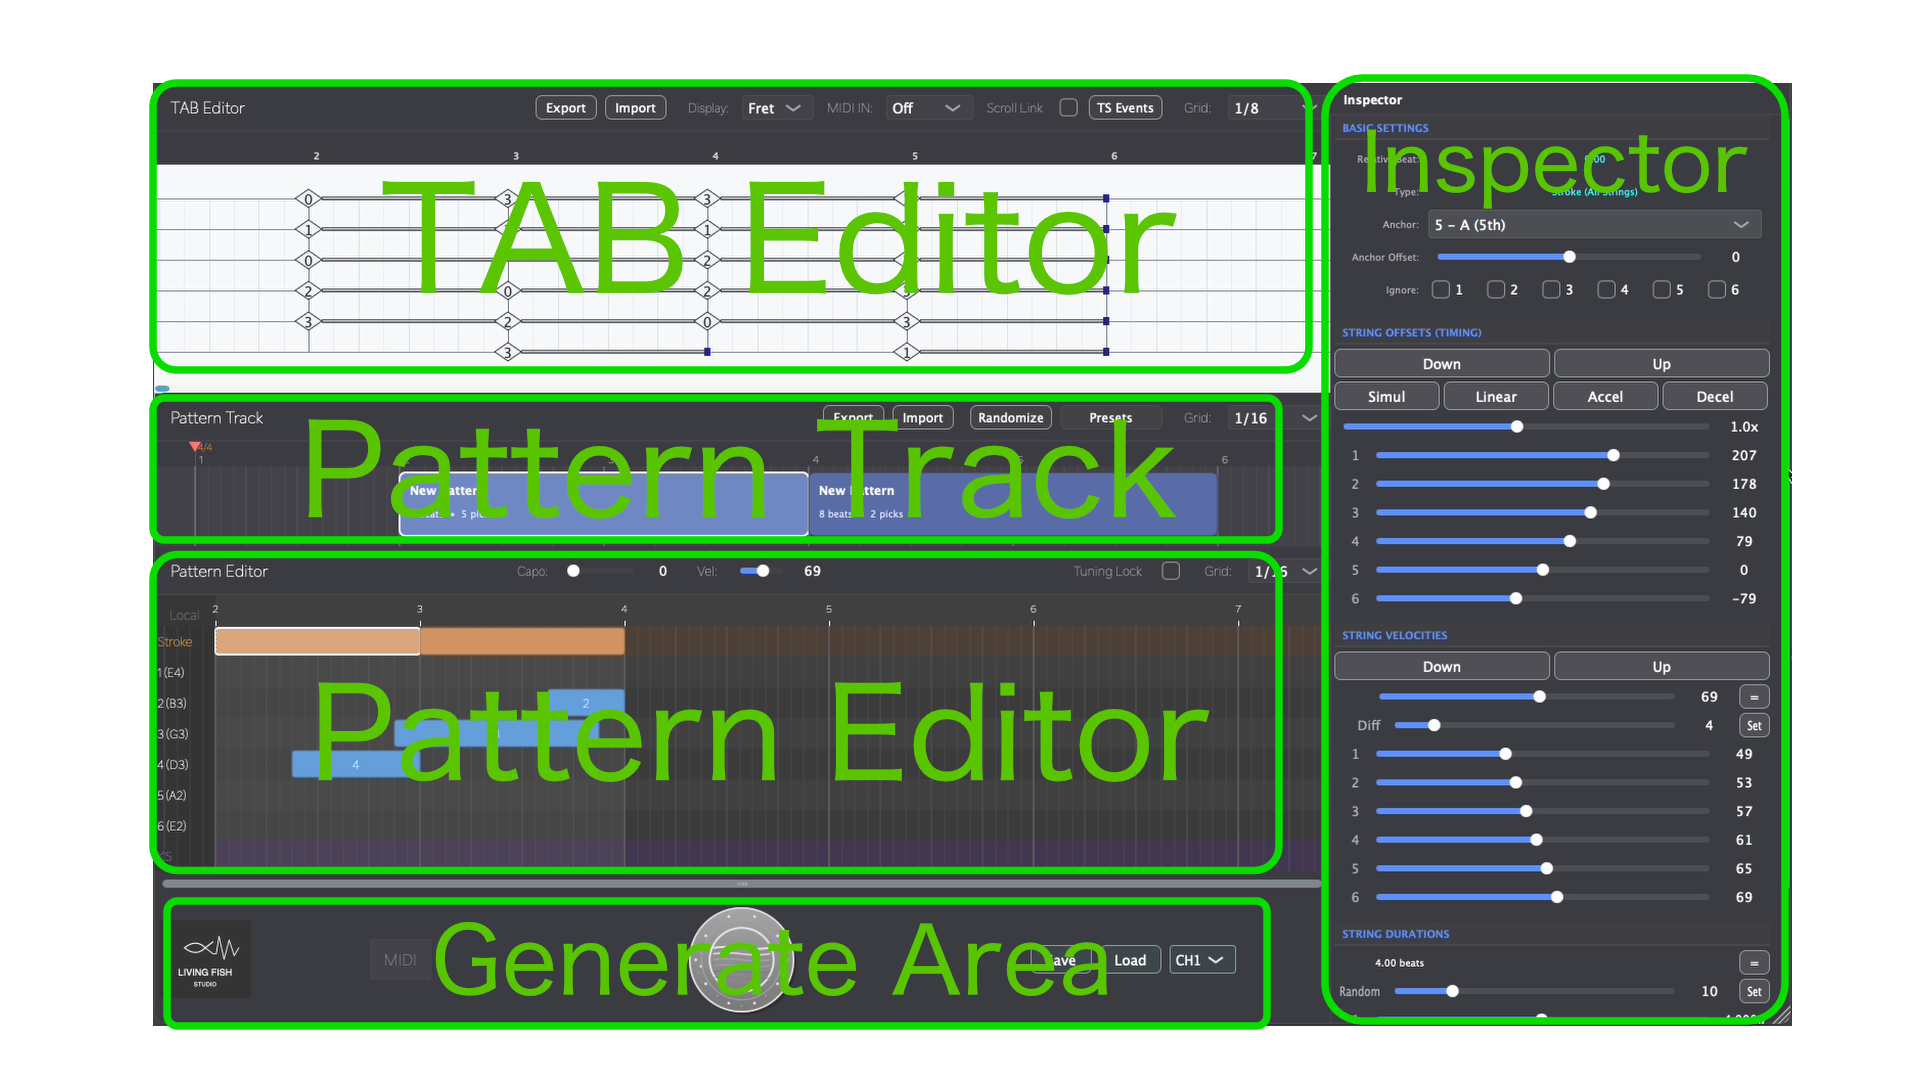
- Top Left: TAB Editor
- Center: Pattern Track
- Bottom: Pattern Editor
- Right Side: Inspector
- Bottom Bar: Generate Area (the area with the large circular button)
Component Details
TAB Editor (Top Left)
An area for entering fret positions in a guitar tablature-like format. This is where you set up chords and melodies.
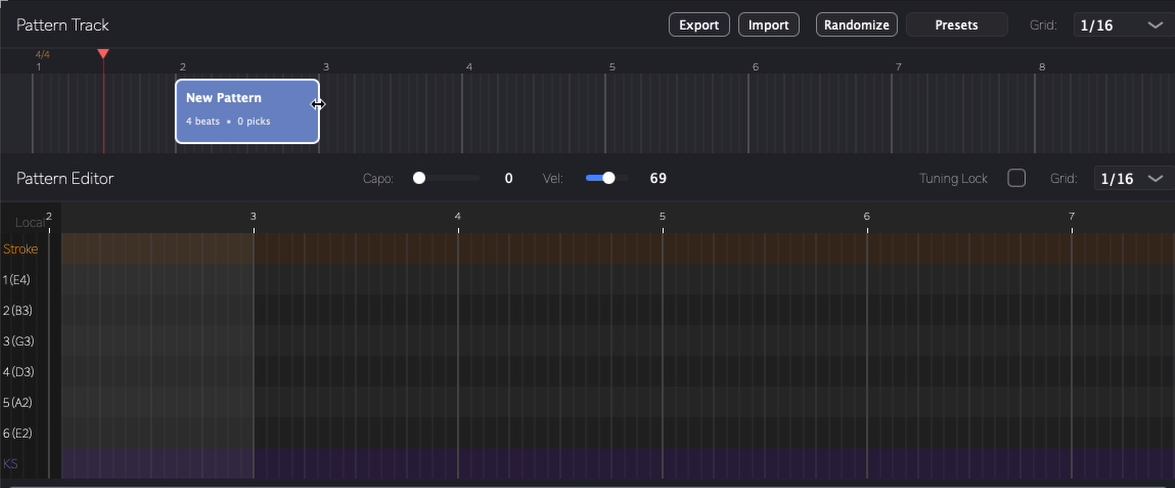
Pattern Track (Center)
An area for managing picking patterns as "blocks". You can easily copy and move patterns as grouped units.
Pattern Editor (Bottom)
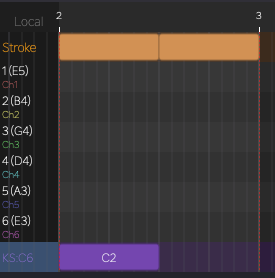
An area for entering picking patterns (string plucking actions) separately from chords. You can configure Stroke settings, individual string input (1-6), and Key Switch (KS) settings.
Inspector (Right Side)
An area for fine-tuning performance nuances. You can specify picking timing, velocity, stroke speed, and more.
Generate Area (Bottom Bar)
Contains the Generate button for creating MIDI, Save/Load buttons for project files, and the Logo which opens the About window.
This plugin generates MIDI by combining TAB and picking patterns. MIDI will not be generated for sections where either data is missing.
Quick Start — How to Get Sound
Set up fret positions
Double-click in the TAB Editor to place notes. Use the Left / Right arrow keys to change the fret number.
Create picking patterns
Double-click in the Pattern Track to create a block, then add strokes and picking in the Pattern Editor.
Fine-tune
Adjust dynamics, timing, and stroke details in the Inspector as needed.
Press Generate, then play in your DAW
This plugin does not produce sound on its own. You must press the Generate button first, then hit play in your DAW to hear the result. You can also drag & drop the MIDI directly onto a DAW track. Any changes you make require pressing Generate again to take effect.
Repeat to build up the entire piece
2. TAB Editor
The TAB Editor is where you manage fret positions. Unlike traditional tablature, you control position and duration like MIDI data rather than note values.

2.1 Basic Input and Editing
2.1.1 Entering Fret Positions
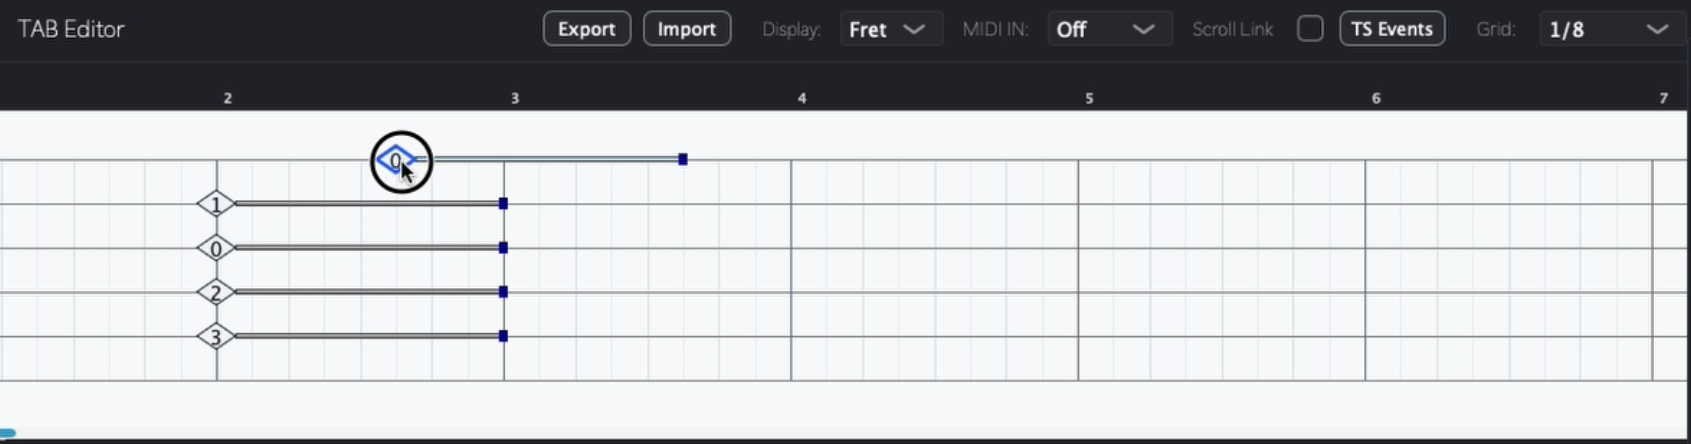
- New Entry: Double-click at the desired location (string/timing) to display a diamond-shaped marker (glyph).
- Setting the Number: With the glyph displayed, type a number directly and press Return (Enter) to confirm the fret number.
- Changing Position: With the glyph selected, press left/right arrow keys to adjust the fret number (0 for open, below 0 shows "×" for muted).
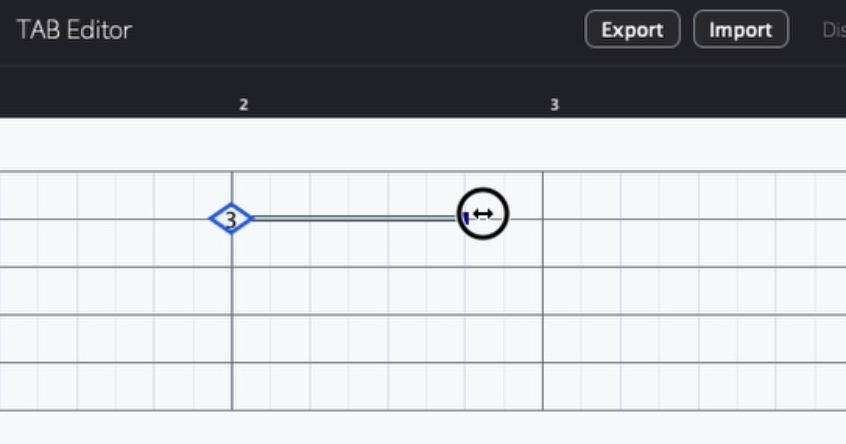
- Adjusting Length: Drag the edge of a note to adjust how long that position is held.
2.1.2 Move, Copy, and Delete
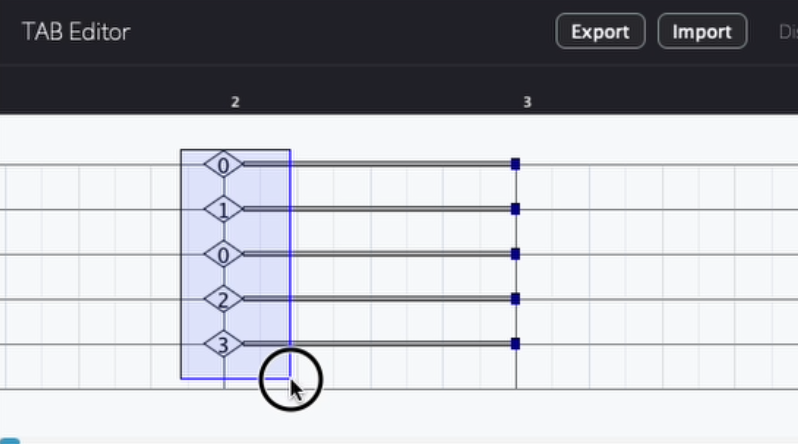
- Move: Select a note and drag it with the mouse.
- Multi-select: Drag from an empty area to select multiple notes at once for group operations.
- Copy: Select notes and drag while holding Option/Alt.
- Delete: Select notes and press the Delete key.
2.1.3 Move to Adjacent String
You can move a selected glyph to an adjacent string while keeping the same pitch. The fret number is automatically recalculated to match the target string's tuning.
- Up arrow key: Move the glyph to the string above.
- Down arrow key: Move the glyph to the string below.
The glyph can only be moved if the adjacent string has no existing glyph at the same timing, and if the pitch can be played on the target string given the current tuning.
2.2 Menu Bar Settings
The menu bar at the top controls overall TAB Editor behavior.

- Grid: Change the timeline grid resolution.
- Scroll Lock: When enabled, synchronizes scrolling with the Pattern Track and Pattern Editor below.
- MIDI IN (Edit Mode): Enables changing fret positions using a MIDI keyboard.
- Display: Switch between "Fret" (fret number) and "Note" (pitch name) display.
- Import/Export: Save or load TAB data as files.
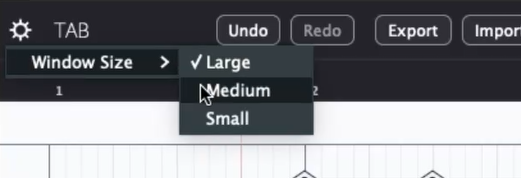
2.2.1 Resizable Window
The plugin window can be resized to one of three sizes: Large (default), Medium, or Small. Click the gear icon on the left end of the TAB Editor menu bar to access the size options.
Import Note
Import overwrites from the playhead position for the length of the imported file. Set the position in your DAW before importing. We recommend saving your TAB data first so you can restore it if needed.
2.3 MIDI to TAB Conversion
A helper utility that converts a Standard MIDI File (SMF Type 0) into a .tab file you can import into the TAB Editor. It attempts to produce reasonably natural fretting positions, so you don't need to know every chord shape on the fretboard. That said, the results won't always be perfect — you may need to adjust voicings and positions by hand.
Input Requirements
- The MIDI file must be single-channel (not multi-channel).
- All chords must be perfectly quantized — notes that start at the same time are treated as a chord.
- This feature is designed for chord-based material. Single-note phrases are not converted.
- Depending on the voicing and tuning, some chords may not be convertible.
2.3.1 How to Use
- Open the conversion dialog from the TAB Editor menu bar.
- Select your source MIDI file and configure the settings below.
- Run the conversion to generate a
.tabfile. - Use the Import button in the TAB Editor to load the generated file.
Import loads from the playhead position. Set your DAW playhead to the correct location before importing.
2.3.2 Conversion Settings
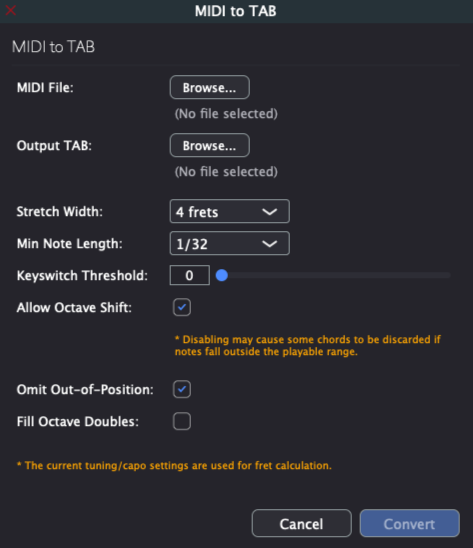
| Parameter | Description |
|---|---|
| MIDI File | The source MIDI file. Save the chords from your song as a perfectly quantized SMF beforehand. |
| Output TAB | Location and filename for the generated .tab file. |
| Stretch Width | How many frets of finger stretch to allow. The actual result may not always stay strictly within this range. |
| Min Note Length | Minimum note duration to include in the conversion. Shorter notes are ignored. |
| Keyswitch Threshold | MIDI note number below which notes are treated as key switches and excluded from conversion. Leave at 0 if your MIDI file contains no key switches. |
| Allow Octave Shift | Allows chord tones to be shifted by octave for better placement on the fretboard. When disabled, some notes may be dropped; when enabled, notes that land too far apart or are too difficult to reach may still be omitted. |
| Omit Out-of-Position | Drops notes that fall outside the allowed stretch range. |
| Fill Octave Doubles | Where available strings remain, fills them with octave duplicates of existing chord tones for a fuller voicing. |
The root note is always placed at the exact pitch from the input MIDI — it is never shifted to a different octave or rearranged into an inversion.
Tip: After conversion, you can quickly adjust fret positions by selecting a glyph and pressing the Up / Down arrow keys to move it to an adjacent string while keeping the same pitch. See 2.1.3 Move to Adjacent String for details.
2.3.3 Drag & Drop Import
You can also import a MIDI file by dragging and dropping it directly onto the TAB Editor. Drop the file at the position where you want the imported data to begin. The MIDI notes are automatically converted to fret positions based on your current tuning settings and loaded into the editor.
Input Requirements
- The MIDI file must be single-channel (not multi-channel).
- All chords must be perfectly quantized — notes that start at the same time are treated as a chord.
- This feature is designed for chord-based material. Single-note phrases are not converted.
- Depending on the voicing and tuning, some chords may not be convertible.
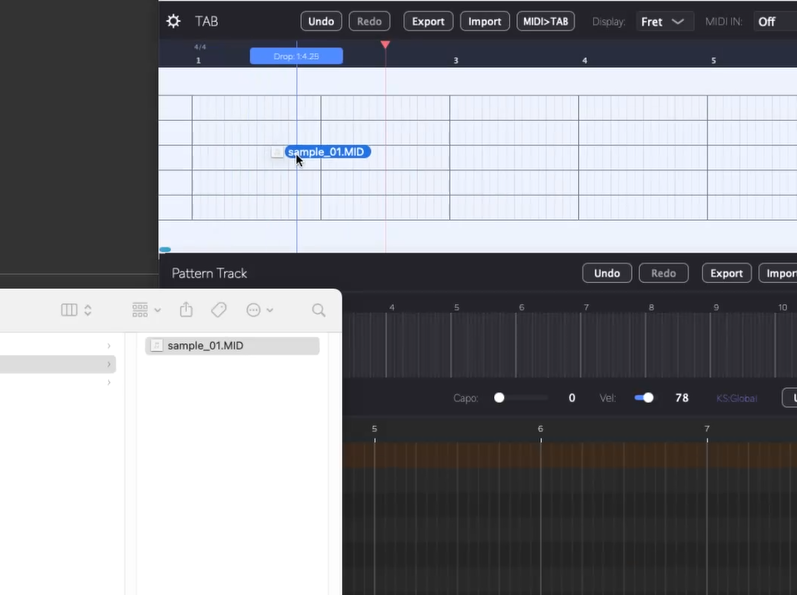
- Save the chord you want to convert as a MIDI file in your DAW.
- Drag the MIDI file onto the TAB Editor and drop it at the desired insert position.
- The notes are converted to fret positions and loaded automatically.
- Add your picking patterns in the Pattern Editor as usual.
Important: Only perfectly quantized chords are converted. Single-note phrases are not supported by this feature.
Tip: If a note ends up on the wrong string, select the glyph and use the Up / Down arrow keys to move it to an adjacent string. The pitch stays the same — only the string and fret number change.
2.4 Time Signature Settings
To change the time signature mid-song, use the "TS (Time Signature) Event" feature.
- Setting Time Signature: Double-click on the timeline area (where bar numbers are displayed) to set the time signature (e.g., 6/8, 5/4). Time signatures can only be set at bar boundaries.
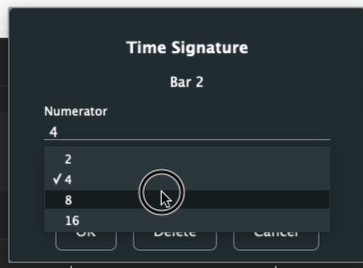
- TS Events: Click the "TS Events" button in the menu to view and manage (delete, etc.) all time signature changes.
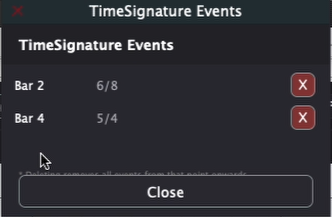
Deleting an earlier TS event will also delete all subsequent TS events.
DAW Sync Note
Time signature settings in this tool do not automatically sync with your DAW. If you change the time signature in your DAW, you must manually set the same time signature in the TAB Editor.
3. Pattern Track
The Pattern Track is where you manage picking information as "blocks" created in the Pattern Editor below. (MIDI is only generated where both TAB fret data and picking data exist.)

3.1 Basic Block Operations
Blocks on the Pattern Track are the building units for your picking pattern arrangement.
- Create: Double-click on an empty area to create and place a New Pattern at that position.
- Move: Drag a block to move it to any position.
- Resize: Drag the right edge to adjust the block length.
- Select/Deselect: Click to select, Cmd+click to deselect.
- Multi-select: Shift+click to select multiple blocks.
- Copy: Drag while holding Alt/Option to duplicate a block.

Right-click (when selected): Context menu
- Save Pattern as Preset...: Save the pattern block as a preset
- Delete Pattern: Delete the pattern block (Delete key also works)
3.2 Preset Feature
A feature for efficiently reusing saved picking patterns.
- Using Presets: Load patterns you've saved previously. You can also import external pattern files using the Import button.
- Filtering:
- User button: Show only your saved presets
- Star mark: Show only "favorite" patterns
- Time signature selection: Show only patterns matching a specific time signature
Note: Factory presets are planned for a future update (timing TBD).
- Placing Presets: Select a preset and drag & drop it onto the Pattern Track.
3.3 Randomize (Auto-generate Picking Patterns)
Use "Randomize" to automatically generate new picking patterns based on specified conditions.
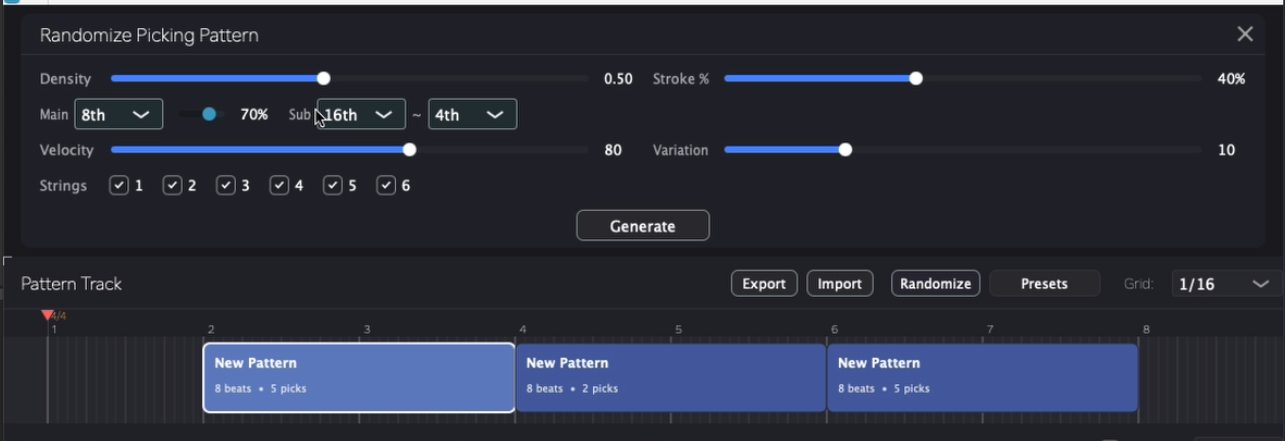
| Parameter | Description |
|---|---|
| Density | How densely to fill picking events within the block |
| Stroke % | Percentage of strokes (multi-string plays) in generated picking |
| Main / Sub | Set the main note duration and its usage ratio |
| Velocity / Variation | Base velocity and range of dynamic variation |
| Strings | Select which strings to use (1-6) |
※ A single pattern block must be selected to apply random generation.
3.4 Shuffle Setting
The Shuffle setting lets you adjust the timing of picking events to add a swing or shuffle feel to your pattern. This works by applying a timing offset to each picking event, shifting it forward or backward from its grid position.
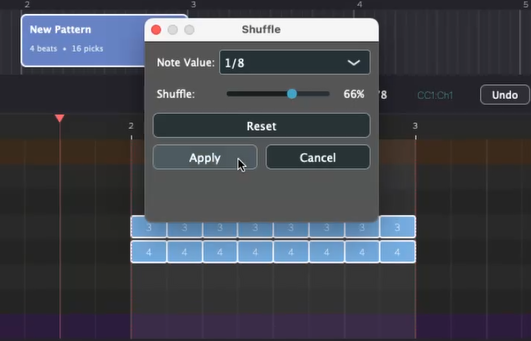
To access the shuffle settings:
- Right-click a picking block to open the context menu.
- Select the shuffle option to open the shuffle settings.
- Adjust the offset amount to control how much the timing shifts.
- Individual adjustment: Fine-tune the offset for each picking event separately.
- Reset all: Clear all shuffle offsets to return to straight timing.
3.5 Export and Import
- Export: Save created patterns as external files.
- Import: Load previously saved external files for reuse.
Import Note
Import overwrites from the playhead position for the length of the imported file. We recommend saving your project using the Save button in the Generate Area first.
3.6 Other Menu Options
- Grid: Like the TAB Editor, you can change grid line resolution to adjust placement precision.
4. Pattern Editor & Inspector
The Pattern Editor is where you set detailed picking patterns for each block in the Pattern Track. A piano roll-like interface lets you control strokes, individual string picking, and key switches.
4.1 Editor Settings (Top Menu)
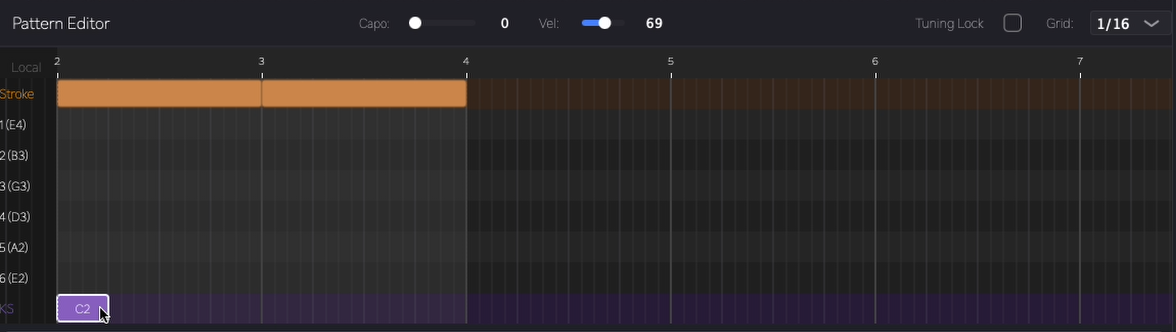
- Grid: Change the timeline grid resolution.
- Tuning Lock: Lock the tuning settings.
- Vel (Default Velocity): Set the default velocity for new picking events.
- Capo: Set capo position (up to fret 24) to easily transpose the overall tuning.
4.2 Entering and Editing Picking Patterns
To enter picking patterns, you must first create or select a pattern block.
When a pattern block is selected, the corresponding area is highlighted in the Pattern Editor.
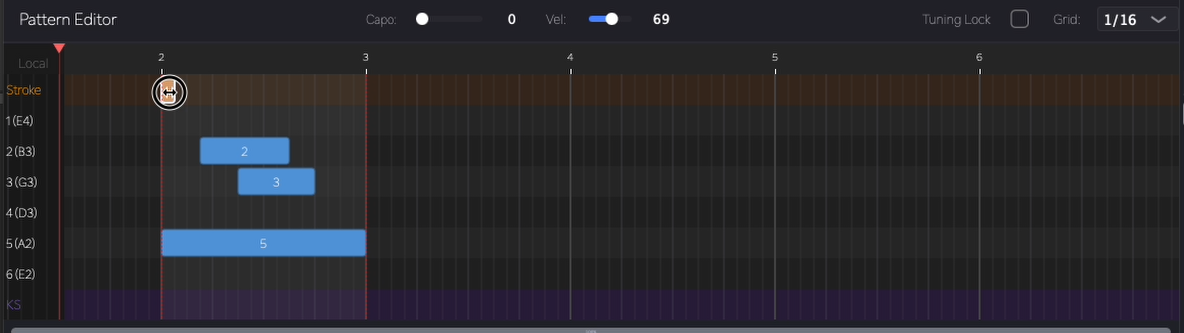
- Entry: Double-click at the desired location to create a one-grid-unit block.
- Resize: Drag the edge of the block to extend it to the desired duration.
Even if you enter picking in the piano roll, no sound will be produced unless there's a corresponding fret position in the TAB Editor at that timing. Both left hand (TAB) and right hand (picking) must be present for notes to sound.
Changing Tuning:
Click the number at the left edge of each string and use left/right arrow keys to change the tuning.
4.3 Inspector Settings
When a block is selected, detailed settings appear in the Inspector on the right side.
4.3.1 Individual String (1-6) Settings
Displayed when an individual string block is selected.
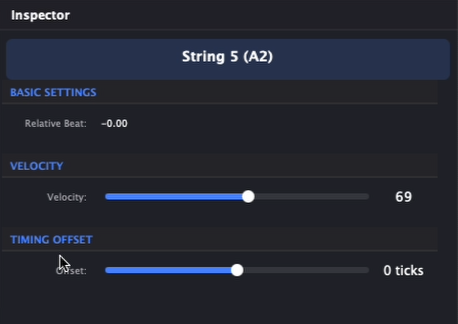
- Velocity: Adjust the volume/intensity of the selected picking.
- Offset: Fine-tune the timing forward or backward from the grid.
4.3.2 Stroke (Multi-string) Settings
When a stroke block is selected, you can configure guitar-specific playing characteristics.
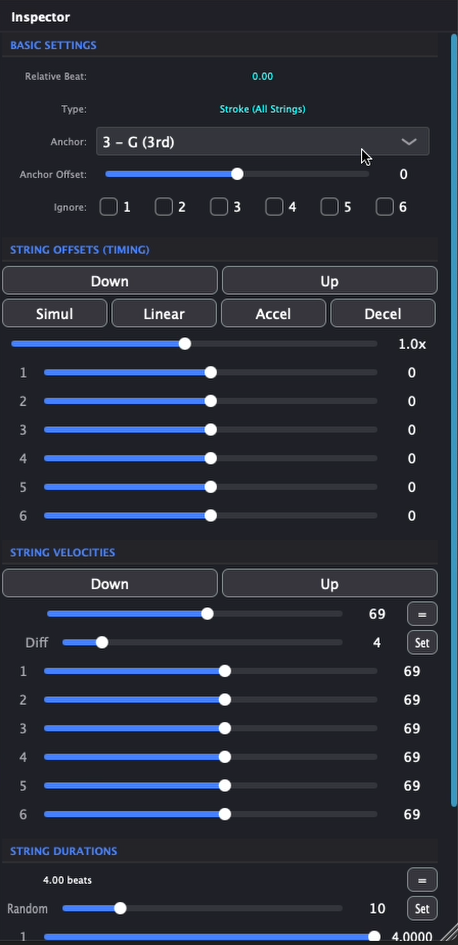
Anchor: Specify which string plays at the exact grid timing within the stroke.

Anchor Offset: Fine-tune the anchor string's timing to adjust the overall stroke timing.
Ignore: Specify strings to skip within the stroke. Useful for letting bass strings sustain while strumming the rest.

String Offset: Freely set the timing offset for each string.
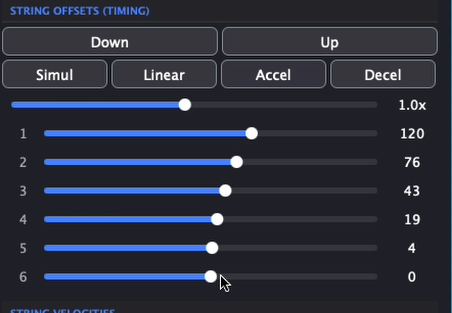
- Direction: DOWN/UP - Select downstroke or upstroke
- Curve: SIMUL (simultaneous), LINEAR (even), ACCEL (accelerating), DECEL (decelerating)
- Multiplier: Scale timing differences from 0.1x to 2.0x
If strings before the anchor are set to play at the start of a pattern block, timing may fall outside the block range, causing MIDI to not generate correctly.
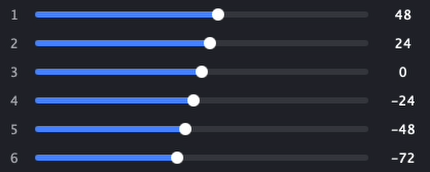
String Velocity: Freely set the velocity for each string.

- DOWN/UP: Presets for bass-heavy or treble-heavy dynamics
- Diff: Velocity change amount per string
- "=" button: Set all strings to equal velocity
- "SET" button: Randomize velocity within the specified range
4.4 Per-String MIDI Channel Output
Each string can be routed to its own MIDI channel (Ch 1–6). Right-click a string label on the left edge of the Pattern Editor to open the channel assignment menu.
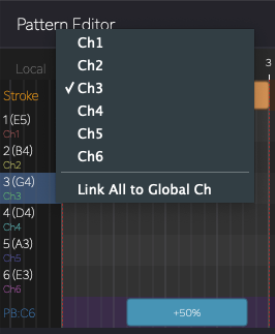
You can assign every string to a different channel, or group specific strings together on the same channel — separate only as many as you need. This means you only have to load as many instrument instances as there are distinct channel groups, rather than one per string.
Use "Link All to Global Ch" in the menu to reset all strings back to the default single-channel output.
4.5 Expression Lane (Key Switch, Pitch Bend & MIDI CC)
Key Switch, Pitch Bend, and MIDI CC controls are combined into a single Expression Lane at the bottom of the Pattern Editor. You can enter blocks in the lane just like picking events — double-click to create, then drag to adjust length.
4.5.1 Switching Between KS, PB, and CC
Select the Expression Lane, then use the Left / Right arrow keys to switch between Key Switch (KS), Pitch Bend (PB), and MIDI CC modes.
Key Switch mode
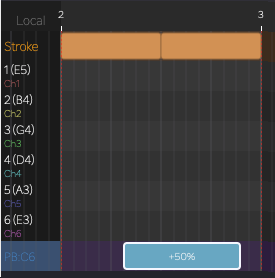
Pitch Bend mode
4.5.2 Per-Channel Targeting
Use the Up / Down arrow keys to switch the target MIDI channel. This lets you apply key switches or pitch bend to individual strings (or groups of strings) based on their channel assignment.
- Example — single-string bend: Assign string 6 to Ch 6, switch the Expression Lane to PB on Ch 6, and place a bend block. Only string 6 will bend.
- Example — group bend: For open-tuning bottleneck slides, assign the target strings to the same channel, then write pitch bend on that channel to bend them together.
Key switches work the same way — they can be targeted per string or per channel group.
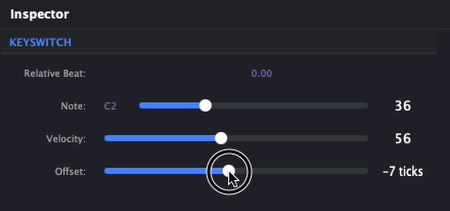
4.5.3 Key Switch Inspector
- Note: Set MIDI note number (0–127)
- Velocity: Adjust key switch signal velocity
- Offset: Fine-tune key switch timing
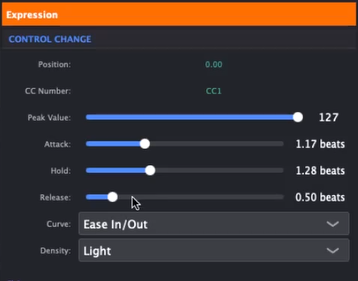
4.5.4 Pitch Bend Inspector
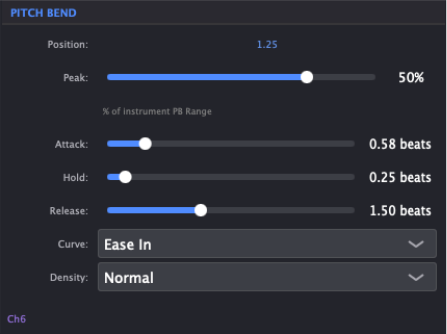
- Peak: Bend amount as a percentage of the instrument's pitch bend range.
- Attack: Time to reach the peak bend value (in beats).
- Hold: Duration to sustain the peak value (in beats).
- Release: Time to return to zero (in beats).
- Curve: Shape of the bend envelope — Linear, Ease In, Ease Out, or Ease In & Out.
- Density: Resolution of the pitch bend MIDI messages.
4.5.5 MIDI CC
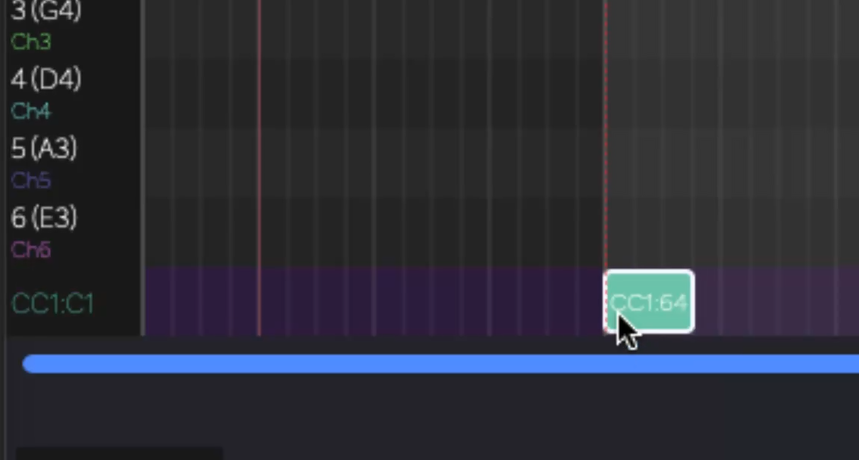
The Expression Lane can be switched to MIDI CC mode, in addition to Key Switch and Pitch Bend. Several MIDI CCs are supported — CC1, CC2, CC11, CC21, and CC74 — and each can be configured per string.
MIDI CC mode
MIDI CC settings
The input method is the same as Pitch Bend:
- Switch the Expression Lane to CC mode using the Left / Right arrow keys.
- Double-click to create a CC block.
- Set the Attack, Hold, and Release times and select a curve type.
While in CC mode, the arrow keys have special functions:
- Up / Down arrow keys: Select the target MIDI channel (string).
- Shift + Up / Down arrow keys: Select the CC number to edit (CC1, CC2, CC11, CC21, CC74).
5. Generate Area
The Generate Area at the bottom of the screen converts information from the TAB and Pattern Editors into final MIDI data for your DAW.

5.1 Generating and Updating MIDI
Use the large circular button in the center to generate MIDI data.
- Generate Button: Press to create MIDI data based on current editor contents. If MIDI is routed to an instrument, you can preview the sound.
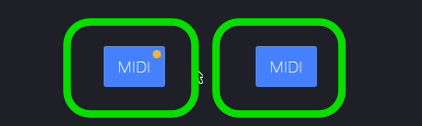
- MIDI Button (Drag & Drop):
- Blue: MIDI is generated and up to date
- Gray: Changes pending or MIDI not yet generated (press Generate again)
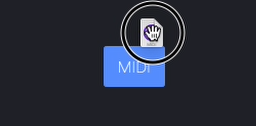
5.2 Drag & Drop to DAW
Drag the MIDI button directly to your DAW timeline to place the generated MIDI.
5.2.1 Output Range
The output range can be switched between all data or selected blocks. A yellow dot on the MIDI button indicates the current mode.
- Selected blocks only: When pattern blocks are selected, a yellow dot appears on the MIDI button. Dragging exports only the selected range.
- All data: When nothing is selected, no yellow dot appears. Dragging exports all MIDI data.
5.2.2 Steps
- Confirm the MIDI button is blue (press Generate if gray).
- Click and drag the MIDI button to your DAW timeline.
5.2.3 Per-Channel Export
Right-click the MIDI button to open the channel selection menu. You can choose which MIDI channels to include in the export — useful when you need to drag specific channels to separate instrument tracks in your DAW.
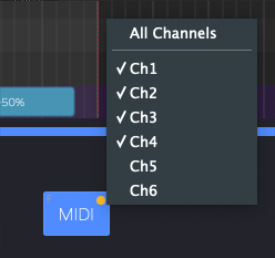
- All Channels: Exports all channels currently in use (default).
- Ch 1–6: Check or uncheck individual channels to export only the ones you need.
5.3 About Button (Logo) and License
The logo at the right edge opens the About window.
- Information: View links to the official website and tool details.
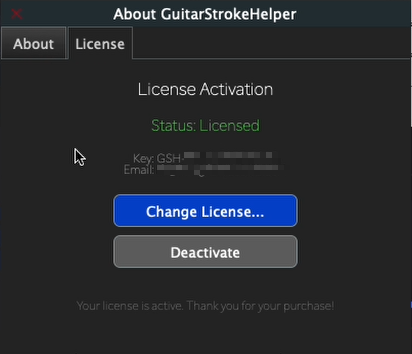
- License Activation: Some features are limited without activation. Load your purchased license file to activate.
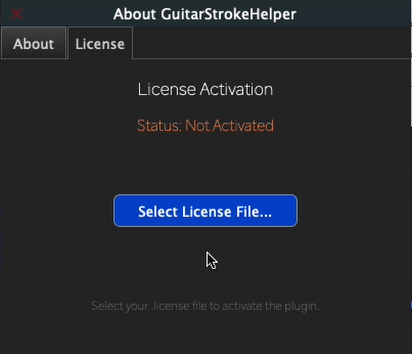
5.3.1 Activation Steps
- Click the logo at the bottom left to open the dialog
- Open the License tab
- Click Select License File... and choose your
.licensefile - On success, the status changes to Licensed
6. Common Operations
Scroll / Zoom
- Mouse wheel: Horizontal scroll
- Cmd/Ctrl + wheel: Zoom
7. Troubleshooting (FAQ)
Generated but MIDI button won't work
- The result may be empty (TAB or Pattern is empty, or everything is Mute/Ignore).
- Or the data is stale after editing. Press Generate again.
Edited but playback hasn't changed
This plugin outputs generated results, so you need to re-Generate after editing.
Time signature doesn't match DAW
- If no time signature events are set in the plugin, it receives the time signature from the DAW, applying it to all TAB data at that moment.
- If time signature changes mid-song, set matching changes in the plugin at the same timing as your DAW.
- Check plugin time signature events in the TAB Editor ruler (shown in orange) or via the TS Events button.